Trong chương này các bạn sẽ được học các điều khiển trình bày danh sách như DropDownList, RadioButtonList… và kết thúc chương các bạn sẽ được học 1 cách chi tiết để sử dụng các List Control này tạo một Module bình chọn cho trang web của bạn.
Điểm chung cho tất cả các điều khiển danh sách là nó gồm 3 thuộc tính chính
Bạn có thể đưa dữ liệu vào DropDownList từ một mảng danh sách hoặc dữ liệu từ một cơ sở dữ liệu:
Thuộc tính quan trọng
- DataSource: chỉ đến nguồn dữ liệu
- DataTextField: trường dữ liệu được hiển thị
- DataValueField: trường dữ liệu thiết lập giá trị với tương ứng với Text hiển thị
Phương thức OnSelectedIndexChanged
Xảy ra khi người dùng thay đổi lựa chọn phần tử trên DropDownList
Điều khiển DropdownList
phép hiển thị một danh sách các lựa chọn, nguời sử dụng chỉ chọn một lựa chọn 1 lần
để sử dụng lớp này bạn tạo 1 trang aspx và trong phần code behind bạn nhập khẩu gói iTechPro.Library, trong trong sự kiện Load của trang bạn gọi như sau
protected void Page_Load(object sender, EventArgs e)
{
DropdownListHelper.Fillcombobox(DropDownList1, "tblIntrodure", "sTitle", "pkIntrodureID");
}
Code 9.1
Kết quả của chương trình sẽ như sau:
Để sử dụng sự kiện OnSelectedIndexchanged bạn cần thêm vào cho DropDownList thuộc tính AutoPostBack và thiết lập cho nó giá trị là true
Code chi tiết
<%@ Page Language="C#" AutoEventWireup="true"	CodeFile="dropdownlist.aspx.cs"
Inherits="_Default" %>
<!DOCTYPE html PUBLIC "-//W3C//DTD XHTML 1.0 Transitional//EN" "http://www.w3.org/TR/xhtml1/DTD/xhtml1-transitional.dtd">
<html xmlns="http://www.w3.org/1999/xhtml" >
<head runat="server">
<title>DropDownList</title>
</head>
<body>
<form id="form1" runat="server">
<div>
<asp:DropDownList AutoPostBack="true" OnSelectedIndexChanged="DropDownList1_Changed" ID="DropDownList1" runat="server">
 </asp:DropDownList><hr />
<asp:Label ID="Label1" runat="server" Text="Label"></asp:Label>
</div>
</form>
</body>
</html>
Code 9.2- Trang dropdownlist.aspx
using System;
using iTechPro.Library;
public partial class _Default : System.Web.UI.Page
{
protected void Page_Load(object sender, EventArgs e)
{
if (!IsPostBack)
{
DropdownListHelper.Fillcombobox(DropDownList1, "tblIntrodure", "sTitle", "pkIntrodureID");
}
}
protected void DropDownList1_Changed(object sender, EventArgs e)
{
Label1.Text = "Text:" + DropDownList1.SelectedItem.Text + "<br>giá tri:" + DropDownList1.SelectedValue.ToString();
}
}
Code 9.3- Trang dropdownlist.aspx.cs
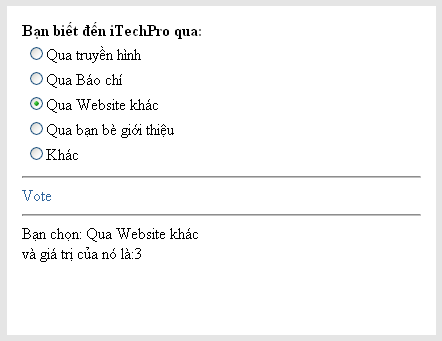
Sử dụng điều khiển RadiobuttonList
Điều khiển RadioButtonList cho phép hiển thị một danh sách các RadioButton mà có thể sắp xếp theo hướng ngang hay dọc, để ngừơi sử dụng có thể chọn một trong các Radiobutton đó.
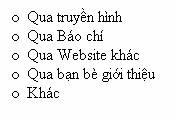
Khi chúng ta cần thăm dò ý kiến khách hàng về một vấn đề gì đó chúng ta cần tạo một module bình chọn cho website của chúng ta.
Chúng ta sẽ thiết lập 1 bảng sau bảng tblSurveyAnswer pkAnswerID (int)
sContent (nvarchar(100))
iVote (int)
iPosition (int)
<%@ Page Language="C#" AutoEventWireup="true"
CodeFile="radiobuttonlist.aspx.cs" Inherits="radiobuttonlist" %>
<!DOCTYPE html PUBLIC "-//W3C//DTD XHTML 1.0 Transitional//EN"
"http://www.w3.org/TR/xhtml1/DTD/xhtml1-transitional.dtd">
<html >
<head runat="server">
<title>RadioButtonList</title>
<style type="Text/css">
body{background-color:#e5e5e5}
#navcontain{width:9px;Height:99px;Background-color:white;margin:px auto; padding:px 15px 15px 15px;}
A:link{COLOR: #31659C; TEXT-DECORATION: none;} A:visited{COLOR: #31659C; TEXT-DECORATION: none;} A:active{COLOR: #FC8800; TEXT-DECORATION: none;}
A:hover{COLOR: #FC8800; TEXT-DECORATION: none;}
</style>
</head>
<body>
<form id="form1" runat="server">
<div id="navcontain">
<b>Bạn biết đến iTechPro qua:</b><br />
<asp:RadioButtonList ID="RadioButtonList1" runat="server">
</asp:RadioButtonList><hr />
<asp:LinkButton ID="lbnVote" OnClick="lbnVote_Click" Text="Vote"
runat="server" />
<hr />
Bạn chọn: <asp:Label runat="server" ID="lblResult" />
</div>
</form>
</body>
</html>
Code 9.4- Trang radiobuttonlist.aspx
using System;
using iTechPro.Library;
public partial class radiobuttonlist : System.Web.UI.Page
{
protected void Page_Load(object sender, EventArgs e)
{
if (!IsPostBack)
{
ListControlHelper.fillRadioButtonList(RadioButtonList1, "tblSurveyAnswer", "sContent", "pkAnswerID");
}
}
protected void lbnVote_Click(object sender, EventArgs e)
{
this.lblResult.Text = RadioButtonList1.SelectedItem.Text + "<br> và giá trị của nó là:" + RadioButtonList1.SelectedItem.Value;
}
}
Code 9.5- Trang radiobuttonlist.aspx.cs Bạn thấy ở Code 9.5 lớp radiobuttonlist.aspx.cs cớ nhập khẩu gói iTechPro.Library có sử dụng phương thức fillRadioButtonList từ lớp ListControlHelper với 4 đối số tương ứng như code ở cuối chương trình
Kết xuất của chương trình
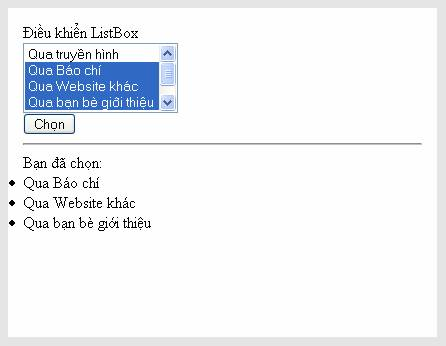
Sử dụng điều khiển ListBox
Nó là một điều khiển giống với DropDownList nhưng nó sẽ hiển thị một danh sách trên trang và chúng ta có thể lựa chọn nhiều phần tử một lúc với thuộc tính selectionMode với hai giá trị là Singer và Multiple.
<%@ Page Language="C#" AutoEventWireup="true" CodeFile="ListBox.aspx.cs"
Inherits="ListBox" %>
<!DOCTYPE html PUBLIC "-//W3C//DTD XHTML 1.0 Transitional//EN"
"http://www.w3.org/TR/xhtml1/DTD/xhtml1-transitional.dtd">
<html >
<head runat="server">
<title>Untitled Page</title>
</head>
<body>
<form id="form1" runat="server">
<div id="navcontain">
Điều khiển ListBox<br />
/><br />
<asp:ListBox SelectionMode="Multiple" ID="listbox1" runat="server"
<asp:Button ID="btnChon" runat="server" Text="Chọn"
OnClick="btnChon_Click" /><hr />
Bạn đã chọn: <asp:Label ID="lblresult" runat="server" />
</div>
</form>
</body>
</html>Code 9.6 ListBox.aspx
using System;
using System.Collections;
using System.Web;
using System.Web.UI.WebControls;
using iTechPro.Library;
public partial class ListBox : System.Web.UI.Page
{
protected void Page_Load(object sender, EventArgs e)
{
if(!IsPostBack)
ListControlHelper.fillListBox(listbox1, "tblSurveyAnswer", "sContent", "pkAnswerID");
}
protected void btnChon_Click(object sender, EventArgs e)
{
lblresult.Text = "";
foreach (ListItem item in listbox1.Items)
{
if (item.Selected)
lblresult.Text += "<li>" + item.Text;
}
}
}
Code 9.7 ListBox.aspx.cs
Trong code 9.7 ta có sử dụng một hàm fillListBox để điền dữ liệu vào ListBox bạn xem code ở cuối bài.
Kết xuất của chương trình
Sử dụng điều khiển CheckBoxList
Giống với điều khiển RadioButtonList nhưng nó cho phép người sử dụng chọn lựa nhiều phần tử.
<%@ Page Language="C#" AutoEventWireup="true" CodeFile="checkBoxList.aspx.cs"
Inherits="checkBoxList" %>
<!DOCTYPE html PUBLIC "-//W3C//DTD XHTML 1.0 Transitional//EN"
"http://www.w3.org/TR/xhtml1/DTD/xhtml1-transitional.dtd">
<html >
<head runat="server">
<title>CheckBoxList</title>
</head>
<body>
<form id="form1" runat="server">
<div id="navcontain">
<b>Bạn biết đến iTechPro qua</b><br />
<asp:CheckBoxList ID="CheckBoxList1" runat="server">
</asp:CheckBoxList><br />
<asp:Button ID="btnVote" OnClick="btnVote_Click" runat="server" Text=" Vote " /><hr />
Bạn đã chọn: <asp:Label ID="lblresult" runat="server" />
</div>
</form>
</body>
</html>Code 9.9
using System;
using System.Collections;
using System.Web;
using System.Web.UI;
using System.Web.UI.WebControls;
using iTechPro.Library;
public partial class checkBoxList : System.Web.UI.Page
{
protected void Page_Load(object sender, EventArgs e)
{
if (!IsPostBack)
{
ListControlHelper.fillCheckBoxList(CheckBoxList1, "tblSurveyAnswer", "sContent", "pkAnswerID");
}
}
protected void btnVote_Click(object sender, EventArgs e)
{
lblresult.Text = "";
for(int i = 0 ;i<CheckBoxList1.Items.Count;i++)
{
if (CheckBoxList1.Items[i].Selected == true)
{
"</li>";
lblresult.Text += "<li>" + CheckBoxList1.Items[i].Text +
}
}
}
}
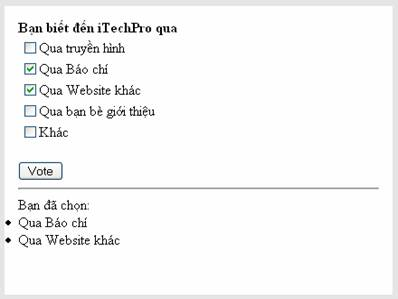
Code 9.10 Trong code 9.10 có sử dụng hàm fillCheckBoxList là phương thức của lớp ListControlHelper(xem cuối chương) để đưa dữ liệu vào CheckBoxList, trong hàm btnVote_Click được thực hiện khi bạn nhấn vào nút Vote trên trang, phương thức này sẽ duyệt từ Item đầu đến hết trong CheckBoxList và kiểm tra nếu Item đó được chọn thì chúng ta sẽ lấy giá trị
Kết xuất của chương trình
Sử dụng điều khiển BulletedList
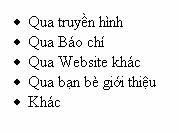
Điều khiển này cho phép bạn hiển thị ra kiểu danh sách hay liệt kê, mỗi phân tử của nó có thể đưa ra là Text, linkButton hay một đường dẫn tới một trang web khác.
Code 9.11
<%@ Page Language="C#" AutoEventWireup="true" CodeFile="BulletList.aspx.cs"
Inherits="BulletListItem" %>
<!DOCTYPE html PUBLIC "-//W3C//DTD XHTML 1.0 Transitional//EN"
"http://www.w3.org/TR/xhtml1/DTD/xhtml1-transitional.dtd">
<html xmlns="http://www.w3.org/1999/xhtml" >
<head runat="server">
<title>BulletList Control</title>
</head>
<body>
<form id="form1" runat="server">
<div id="navcontain">
<asp:BulletedList ID="BulletedList1" runat="server">
</asp:BulletedList>
</div>
</form>
</body>
</html>
Code 9.12
using System;
using System.Web;
using System.Web.UI;
using System.Web.UI.WebControls;
using iTechPro.Library;
public partial class BulletListItem : System.Web.UI.Page
{
protected void Page_Load(object sender, EventArgs e)
{
if (!IsPostBack)
{
ListControlHelper.fillBulletList(BulletedList1, "tblSurveyAnswer", "sContent", "pkAnswerID");
}
}
}
Kết xuất của chương trình
Bạn có thể điều chỉnh sự xuất hiện của bullet trong BulletList với thuộc tính BulletStyle với các giá trị có thể có sau:
Circle, CustomImage, Disc, LowerAlpha, LowerRoman, NotSet, Numbered, Square, UpperAlpha, UpperRoman,
Với thuộc tính có giá trị là CustomImage bạn cần chỉ đến đường dẫn của ảnh trong thuộc tính BulletImageURL
Ví dụ trong Code 9.11 bạn thêm vào thuộc tính Bulletstyle với giá trị là Circle bạn sẽ thấy kết xuất của chương trình như sau: